About Startup Code
A project can contain more than one guest. Each guest needs four components:
- Vector table (startup_same70.c)
- Stack
- Startup code (startup_same70.c)
- Program code (main.c)
To get started fast, download the Hermes example project linked below. This has a pre-configured project with a stable version of the Hermes hypervisor running some demo guests.
To get the newest version of Hermes with custom drivers, you can follow the steps below in the Project Setup section.
Download Example ProjectCreating a project from scratch that uses the Hermes hypervisor isn't too hard — it should only take about 30 minutes. This is the best way to start from a clean slate with up-to-date drivers and other software.
Create a new ASF C project in Atmel Studio.

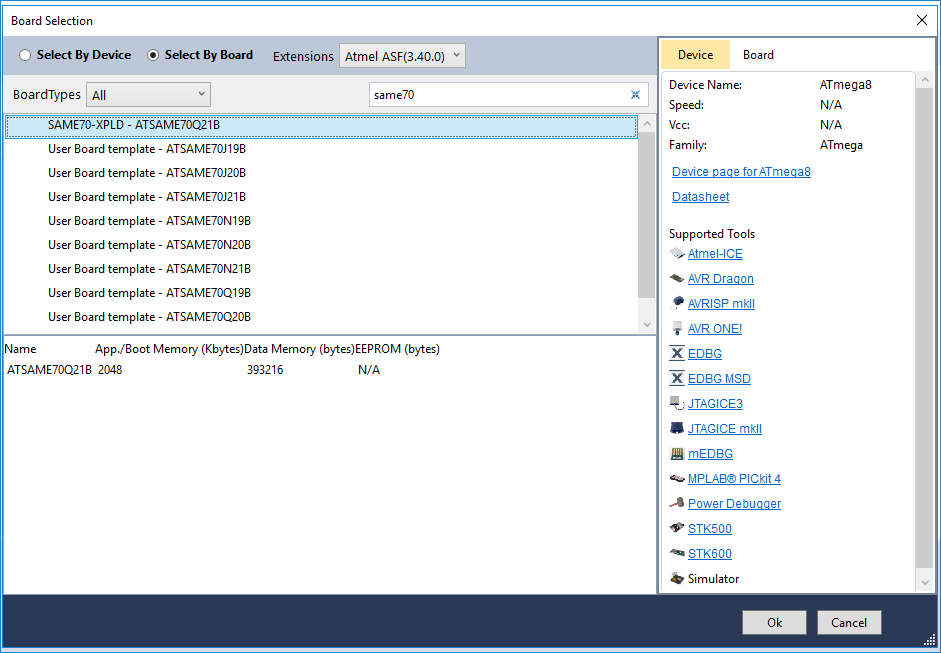
Pick the right MCU/board. I'm using the SAME70 Xplained. Click OK to get the standard blank project setup with a main.c file and a bunch of other junk in it, including the ASF drivers.

Go back to Atmel Studio, right click on the src directory in the Solution Explorer (usually on the right side of screen), and click Add → New Folder.

Now right-click on the new hermes folder you created and click Open Folder. This will open up the folder in Windows Explorer. Right-click inside the hermesfolder that this opens up and click Git Clone.

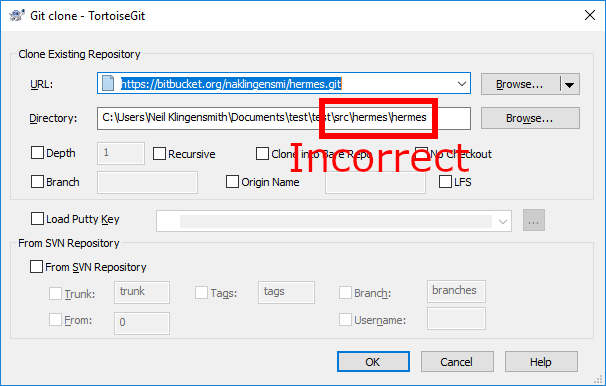
In the Tortoise Git dialog box, paste in the URL for the Hermes repo source. You will need to edit the directory that the repo will be checked out to. In the screenshot below, Tortoise Git wants to check the repo out to C:\...\test\src\hermes\hermes. Be sure to remove the second hermes from the checkout path. See screenshots below for the correct checkout path. Click OK and check out the source into your project folder.

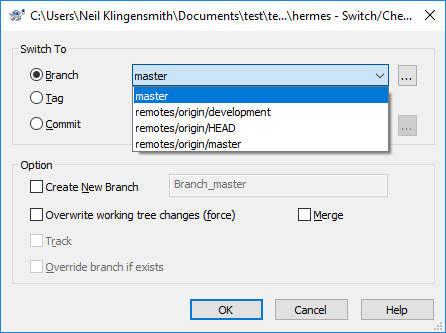
 You'll probably also want to check out the most recent Hermes code. Right-click in your hermes directory and choose TortoiseGit → Switch/Checkout. Then choose the development branch and click OK.

Go back to Atmel Studio, right click on the hermes directory in the Solution Explorer, and click Add → Existing Files.

Now select all the files you checked out in the hermes directory. You now have all the files in place, but you need to make some modifications to the startup code.
We will now configure the vector table to boot into Hermes and initialize the project's main() function as a guest inside Hermes. In the Solution Explorer, search for a file called startup_same70.c. This is the startup code for the example project that contains the vector table and the startup code. Open this file up.

A project can contain more than one guest. Each guest needs four components:
First, find the vector table in startup_same70.c and comment out the line __attribute__ ((section(".vectors"))) .
This should be on or about line 190 of the unmodified C-file.
This line tells the C compiler to put the vector table at a specific address in memory where the CPU will look for it on boot. In order to make the CPU boot into Hermes, we need to put the Hermes vector table at that address, hence commenting this line out. We still need to keep this vector table, but we just don't want it to be located at the vector table address on boot.
Next, we will statically allocate a stack for this guest as a C array.
Just above the beginning of exception_table, define char guest1_stack[GUEST1_STACK_SIZE] as in the code example below.
A stack size of 4k usually works well, but this will be application-dependent.
You may want to move the #define for the stack size to a different location.
/* Exception Table */
//__attribute__ ((section(".vectors")))
#define GUEST1_STACK_SIZE 4096
char guest1_stack[GUEST1_STACK_SIZE];
const DeviceVectors exception_table = {

        /* Configure Initial Stack Pointer, using linker-generated symbols */
        .pvStack = (void*) (&guest1_stack[0]+GUEST1_STACK_SIZE),

        .pfnReset_Handler      = (void*) Reset_Handler,
        .pfnNMI_Handler        = (void*) NMI_Handler,
        .pfnHardFault_Handler  = (void*) HardFault_Handler,
        .pfnMemManage_Handler  = (void*) MemManage_Handler,
        .pfnBusFault_Handler   = (void*) BusFault_Handler,
The last thing that needs to be done is to comment out some lines in the guest's startup code. These lines initialize some of the variables in memory on boot. This will be handled by Hermes, and it does not need to be replicated here. The lines to comment out are shown in the code snippet below. They start at or about line 392 of startup_same70.c. Comment out code starting at the beginning of Reset_Handler up to the call to __libc_init_array().
The last thing we need to do is to set the guest's vector table offset register (VTOR).
This sets the address of the virtual machine's vector table.
The stock startup code uses a method of setting the vector table that is incompatible with Hermes, so we will need to change it.
After the commented code (which contains with the VTOR assignment) add SCB->VTOR = ((uint32_t)&exception_table); followed by asm("isb");
This explicitly sets the VM's VTOR to the address of exception_table (which we modified above).
/**
 * \brief This is the code that gets_g2 called on processor reset.
 * To initialize the device, and call the main_g2() routine.
 */
void Reset_Handler(void)
{
        uint32_t *pSrc, *pDest;
#if 0
        /* Initialize the relocate segment */
        pSrc = &_etext;
        pDest = &_srelocate;

        if (pSrc != pDest) {
                for (; pDest < &_erelocate;) {
                        *pDest++ = *pSrc++;
                }
        }

        /* Clear the zero segment */
        for (pDest = &_szero; pDest < &_ezero;) {
                *pDest++ = 0;
        }
        /* Set the vector table base address */
        pSrc = (uint32_t *) & _sfixed;
        SCB->VTOR = ((uint32_t) pSrc & SCB_VTOR_TBLOFF_Msk);

        /* Initialize the C library */
        __libc_init_array();
#endif

        SCB->VTOR = ((uint32_t)&exception_table);
        asm("isb");
DONE!!! This modified file contains (1) a stack, (2) a vector table, and (3) a call to the guest's main() function (just below the startup code snippet we commented out). You can write whatever code you want in main(), compile and run.